


Create a project, Application development using XIB.
EnvironmentIntroduction
Just as there is more than one recipe for curry, there is more than one way to develop an iOS app.
The method I'm going to introduce here is the standard way I do it, but it is not necessarily the best. There is a best way for each project and each person.
I hope that my recipe presented here is a flavor that suits you.
Environment
⛏ Xcode 12.5
🕊 Swift 5.3.2
🍎 macOS BigSur 11.1
📱 iOS 13.0 ~ 14.5
Sample
Here is a sample. 👉 DoshCook/SwiftRecipesSample.
Create A Project
Let's create a project.
Select iOS > App > next.(Figure 1)
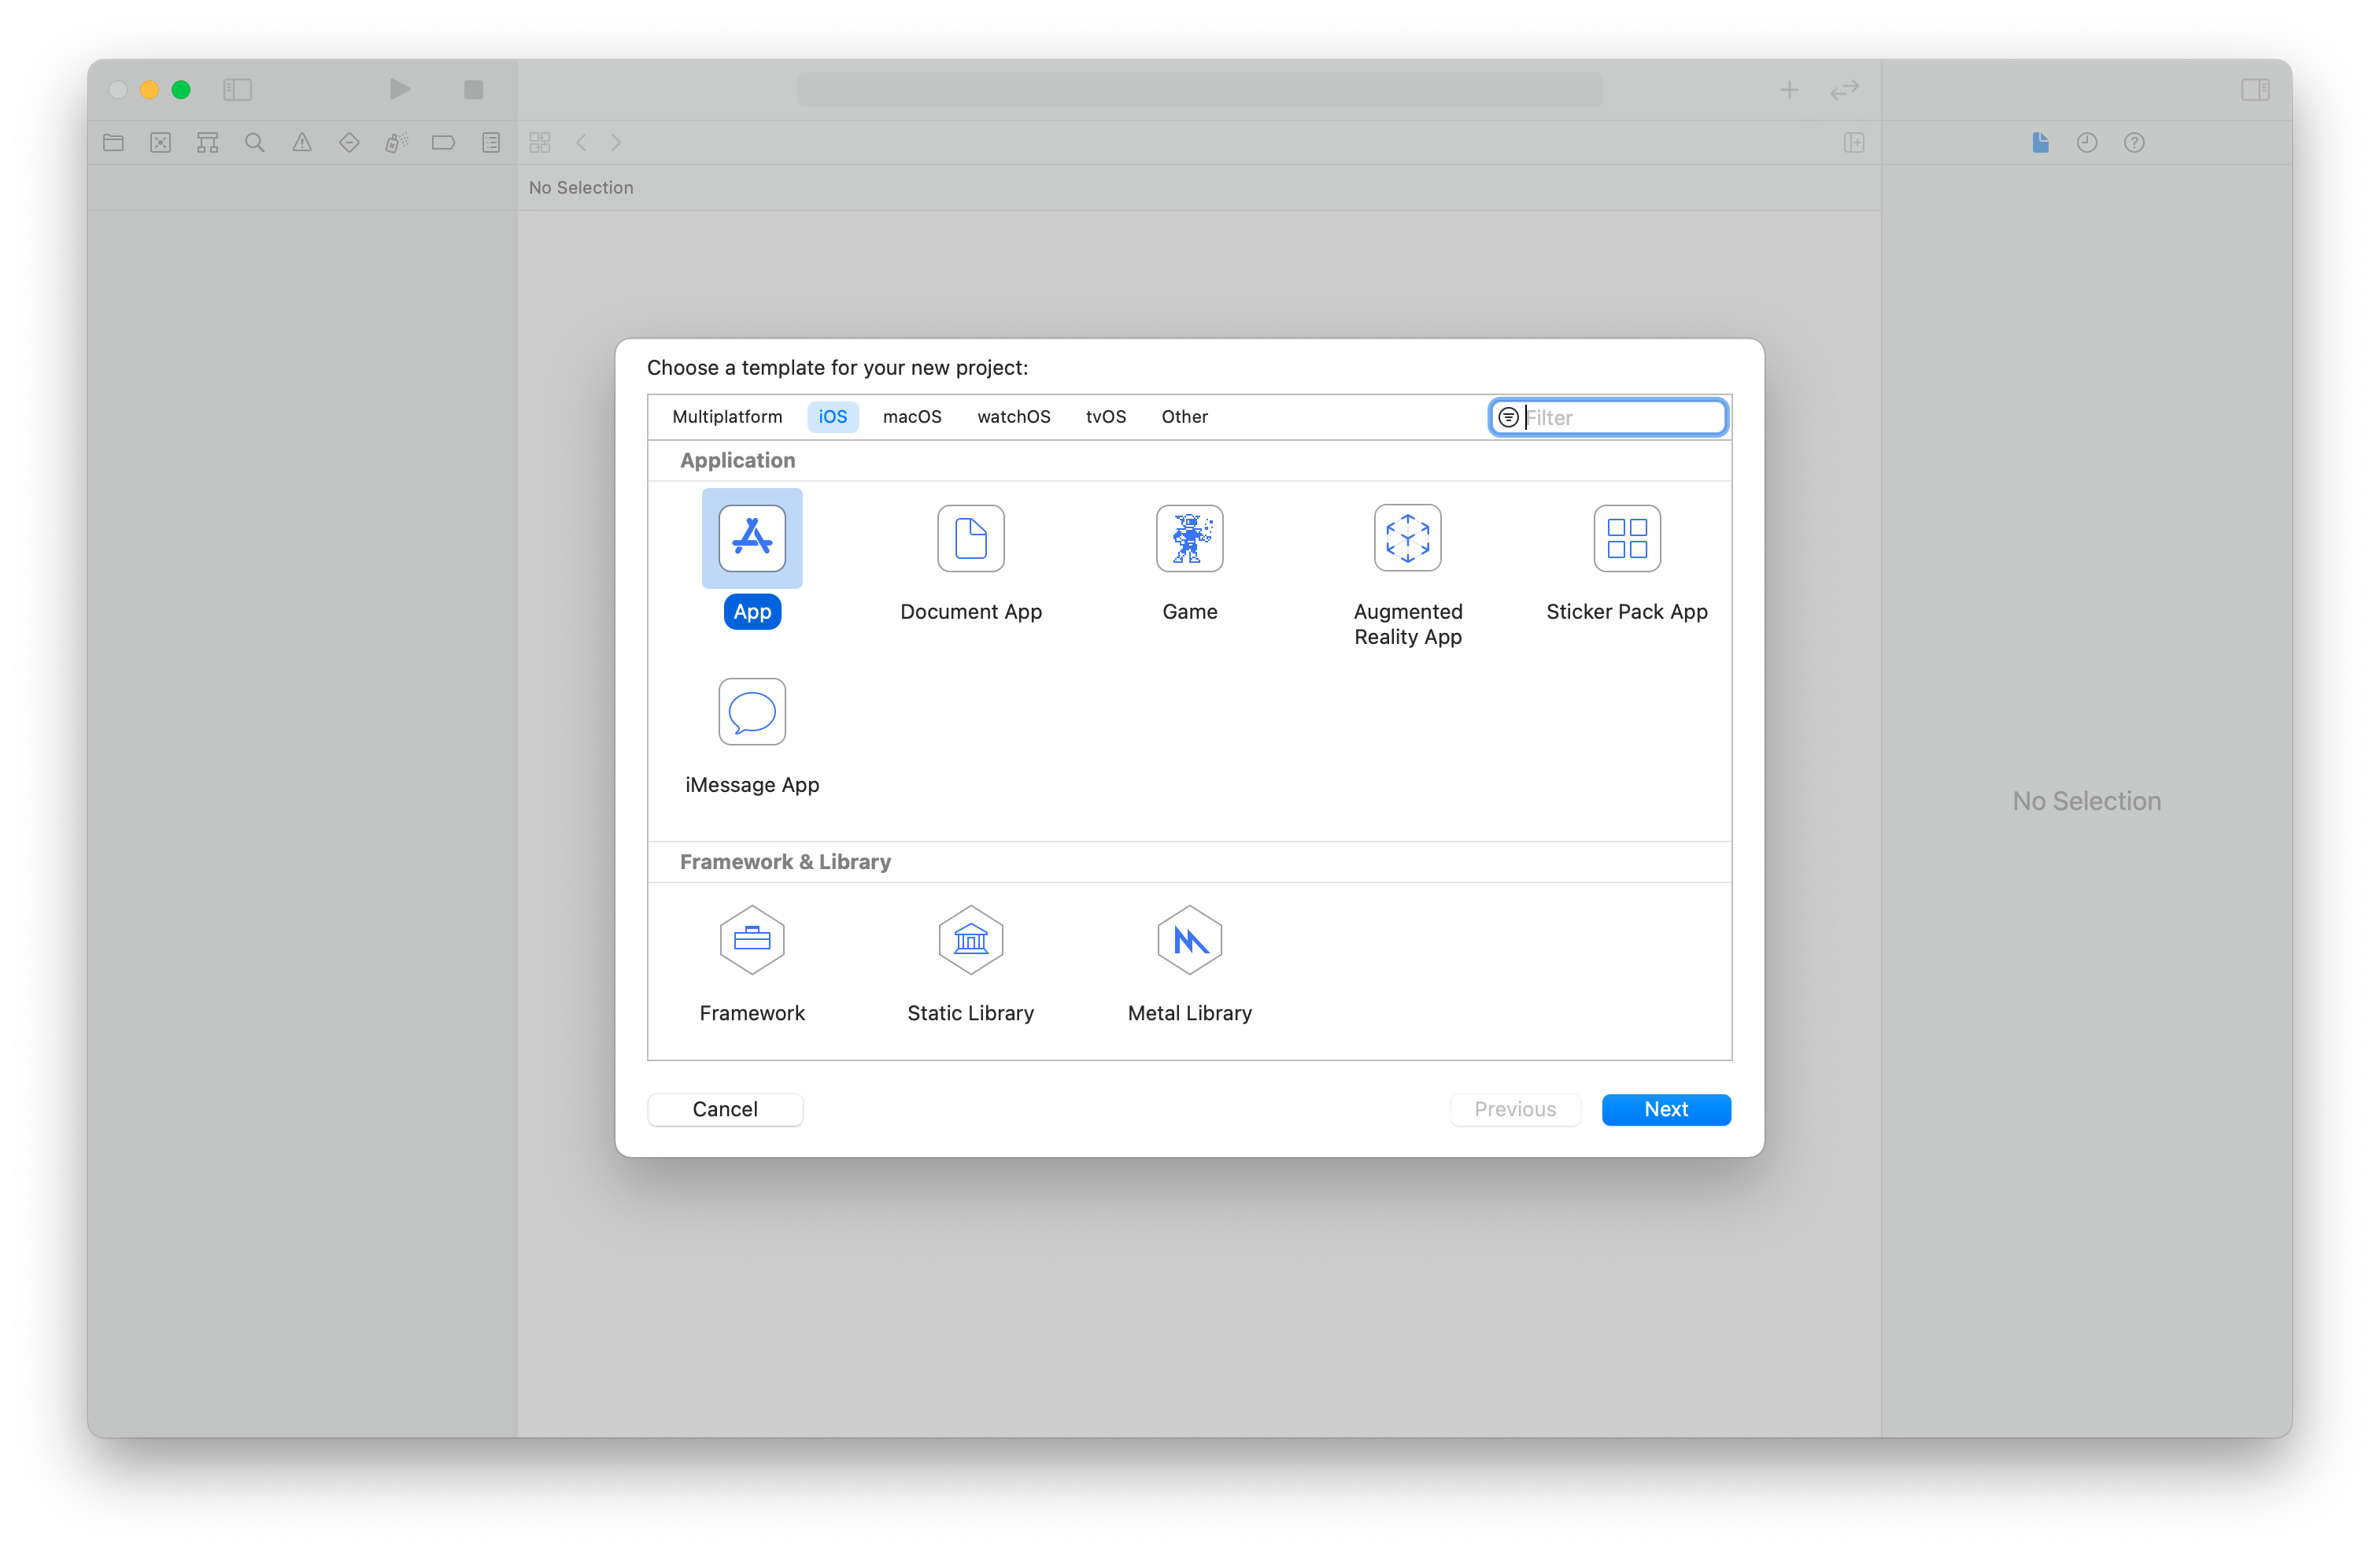
Figure 1
Add a Product Name and configure as follows.(Figure 2)
| Item | Select Item |
|---|---|
| Interface | Storyboard |
| Life Cycle | UIKit App Delegate |
| Language | Swift |
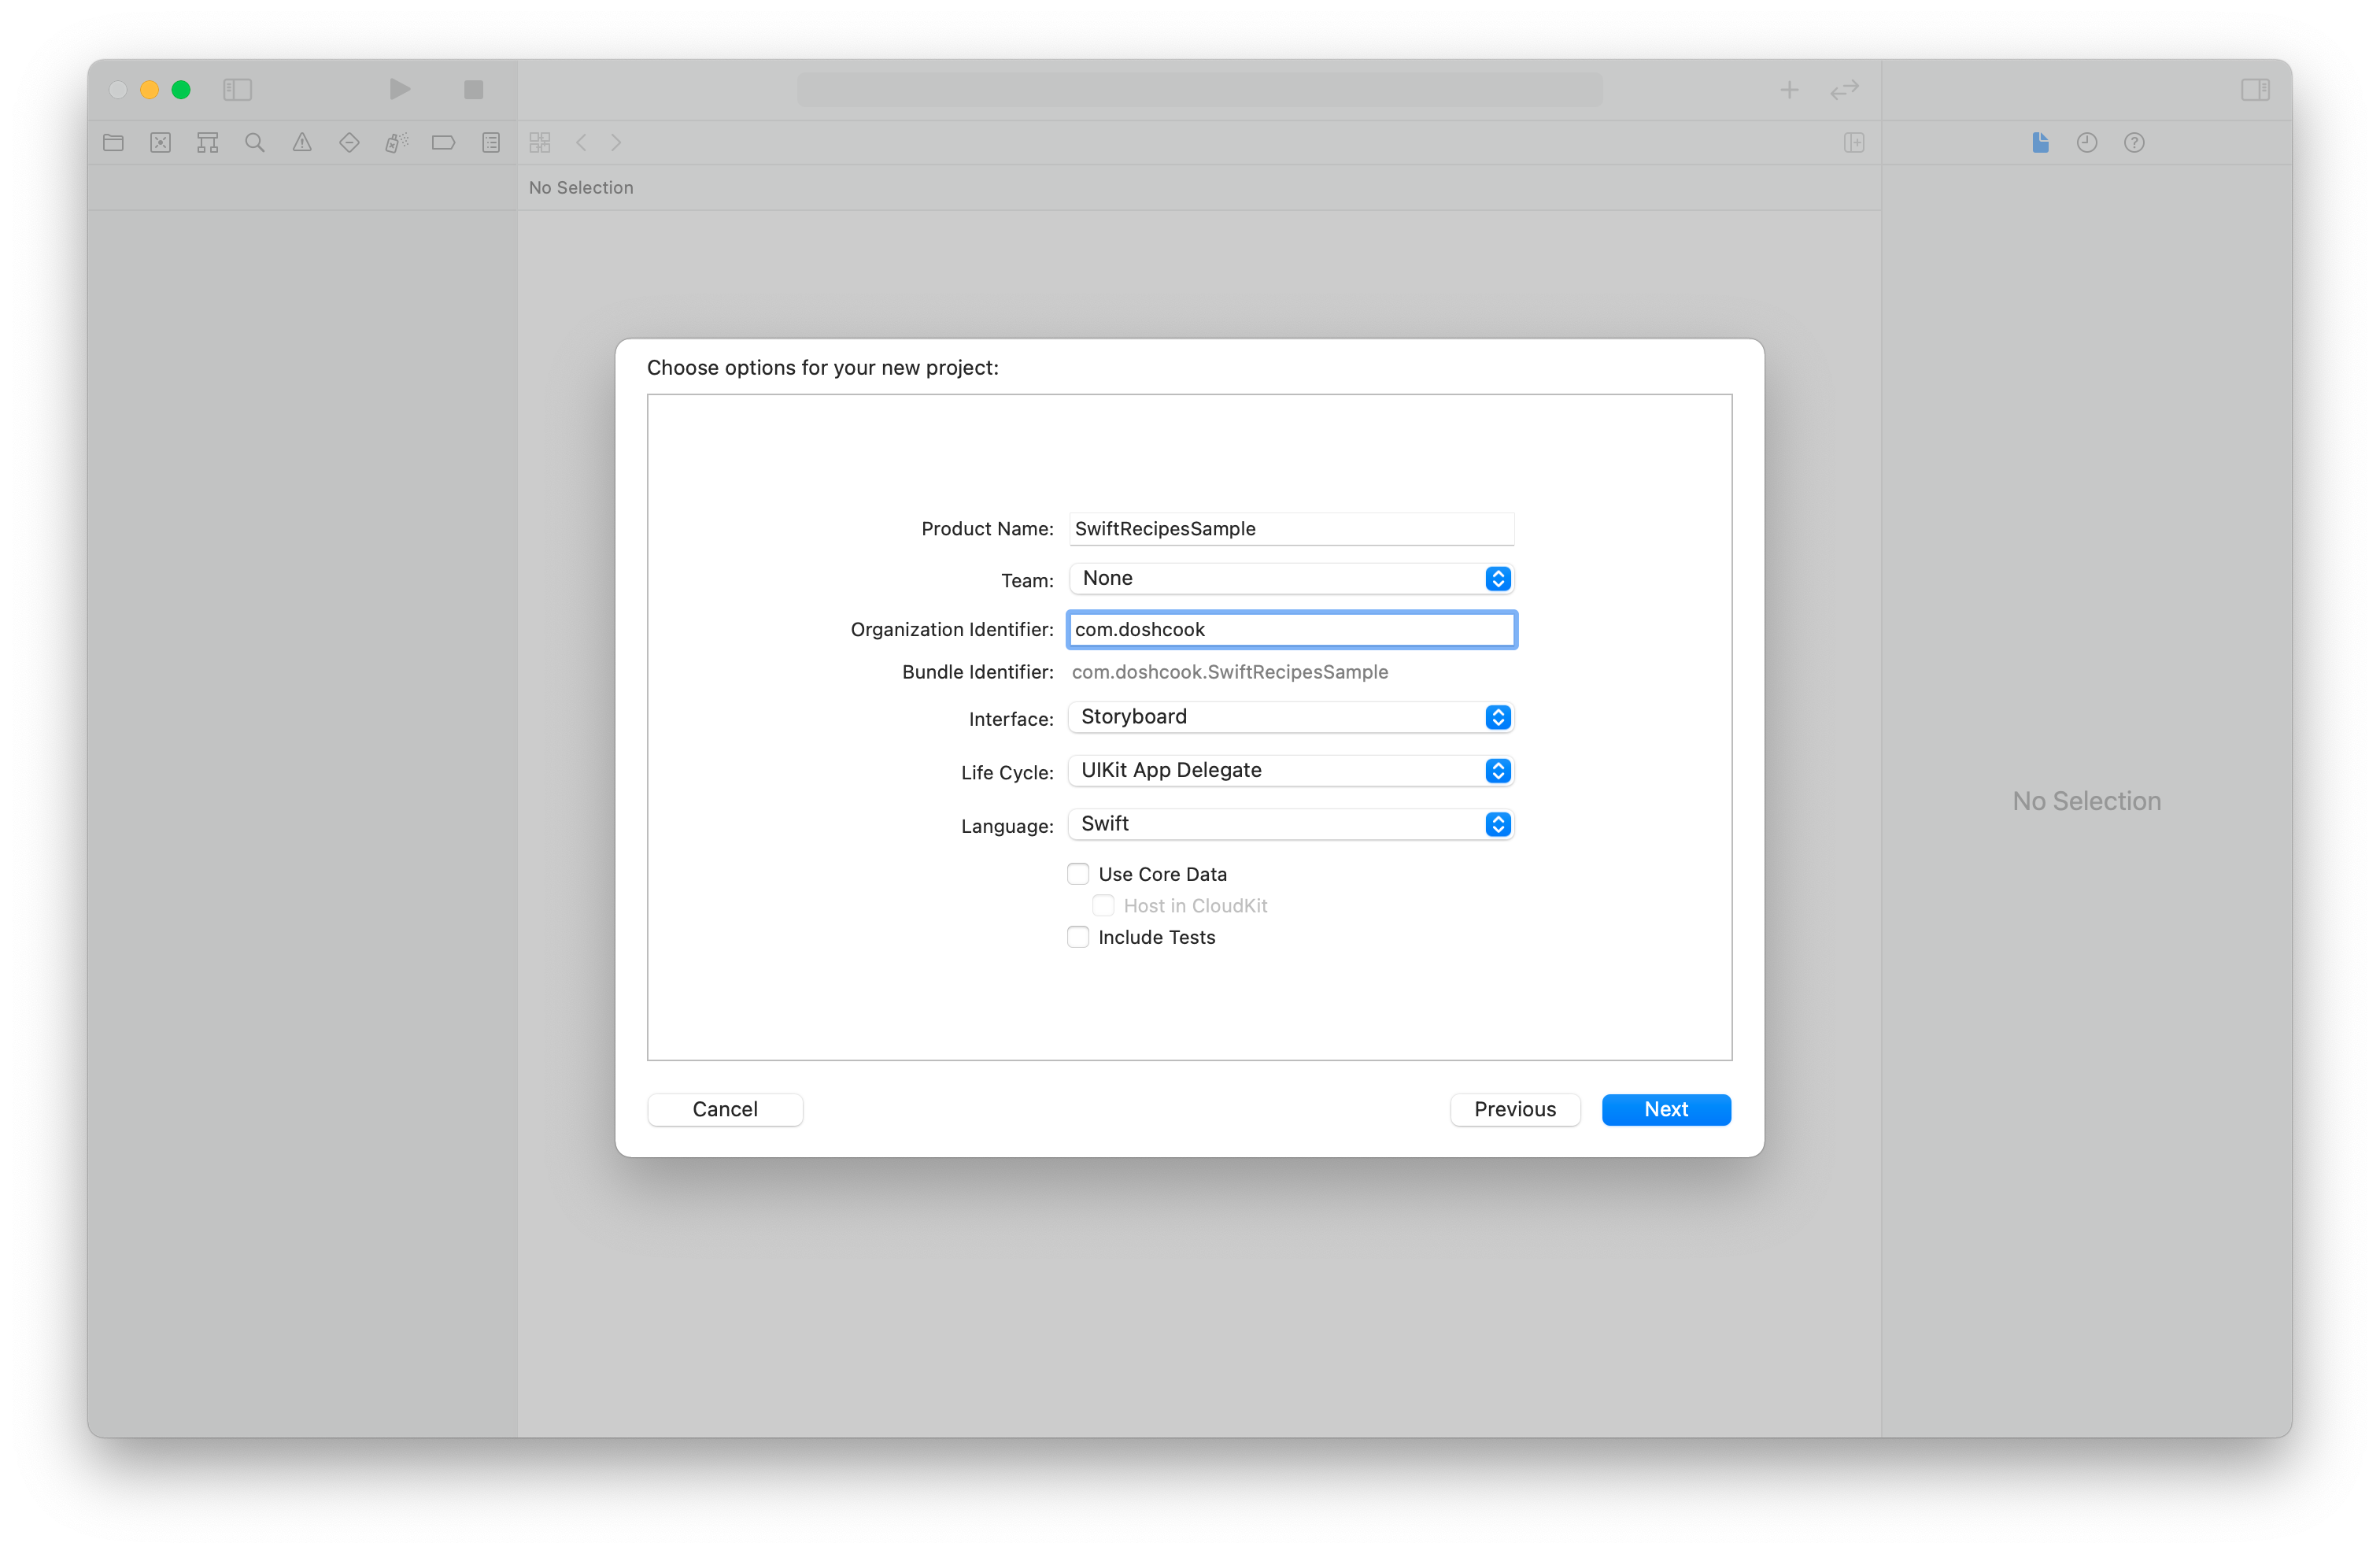
Figure 2
Organize Your Directory
Organize the files you have from the beginning.
The configuration at the time of project creation is as follows.
.
├─ ProjectName.xcodeproj
└─ ProjectName
    ├── AppDelegate.swift # Manage the entire app lifecycle.(required)
    ├── Assets.xcassets # Manage images and colors.
    ├── Base.lproj # LaunchScreen.storyboard and Main.storyboard are included.
    ├── Info.plist # A file that configures the information needed to run the application.(required)
    ├── SceneDelegate.swift # Manage Scenes.
    └── ViewController.swift # ViewController provided by default.
Split it in Resources, Scripts and Storyboards.
.
├─ ProjectName.xcodeproj
└─ ProjectName
    ├── Scripts
    |    ├── AppDelegate.swift
    |    ├── SceneDelegate.swift
    |    └── ViewController.swift
    ├── Resources
    |    ├── Info.plist
    |    └── Assets.xcassets
    └──  Sotryboards
        └── Base.lproj
Make sure that the project tree in Xcode and the structure in the actual directory match as shown in Figure 3 and Figure 4.
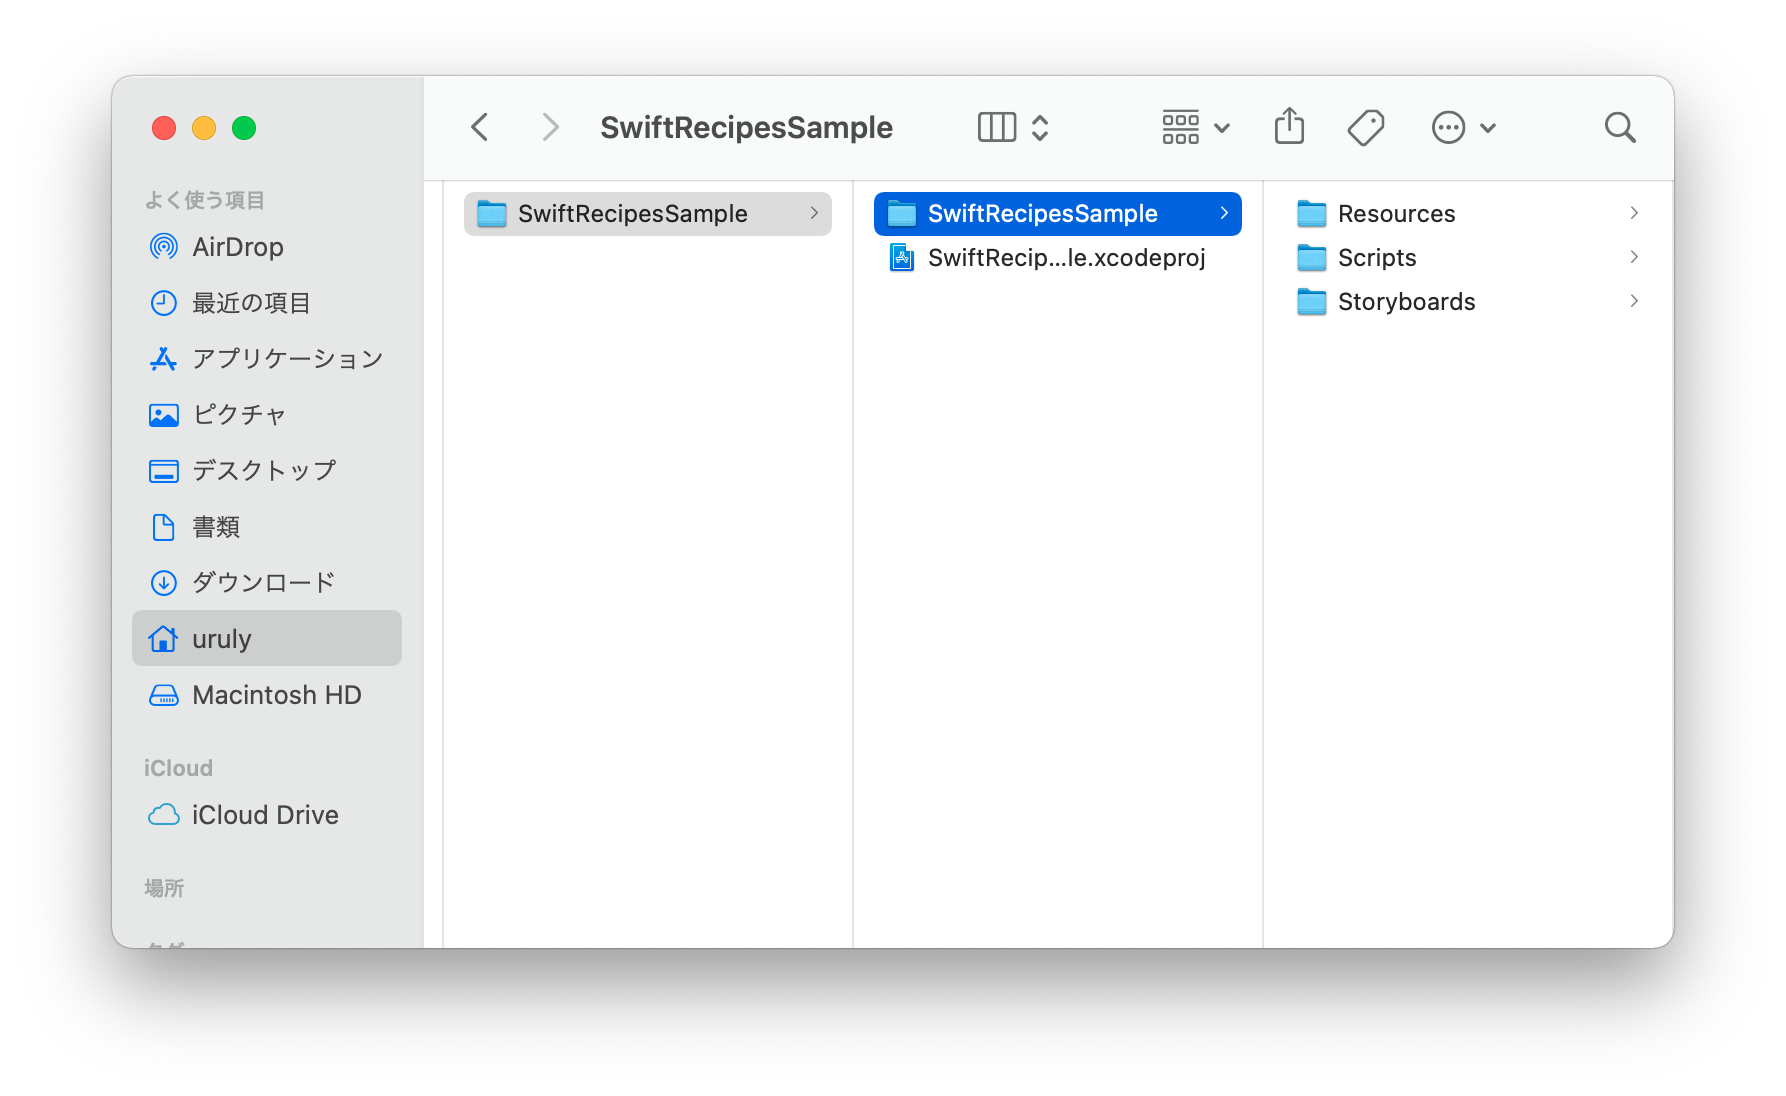
Figure 3
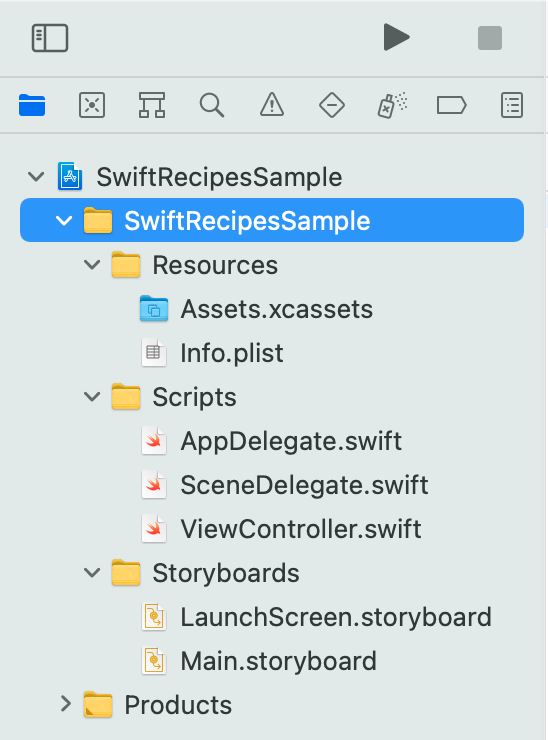
Figure 4
Because we changed the location of Info.plist, we get the following error and cannot build.
Build input file cannot be found: '/Users/uruly/DoshCook/XcodeProjects/SwiftRecipesSample/SwiftRecipesSample/Info.plist'
Modify Info.plist in Build Settings to be under Resources. (Figure 5)
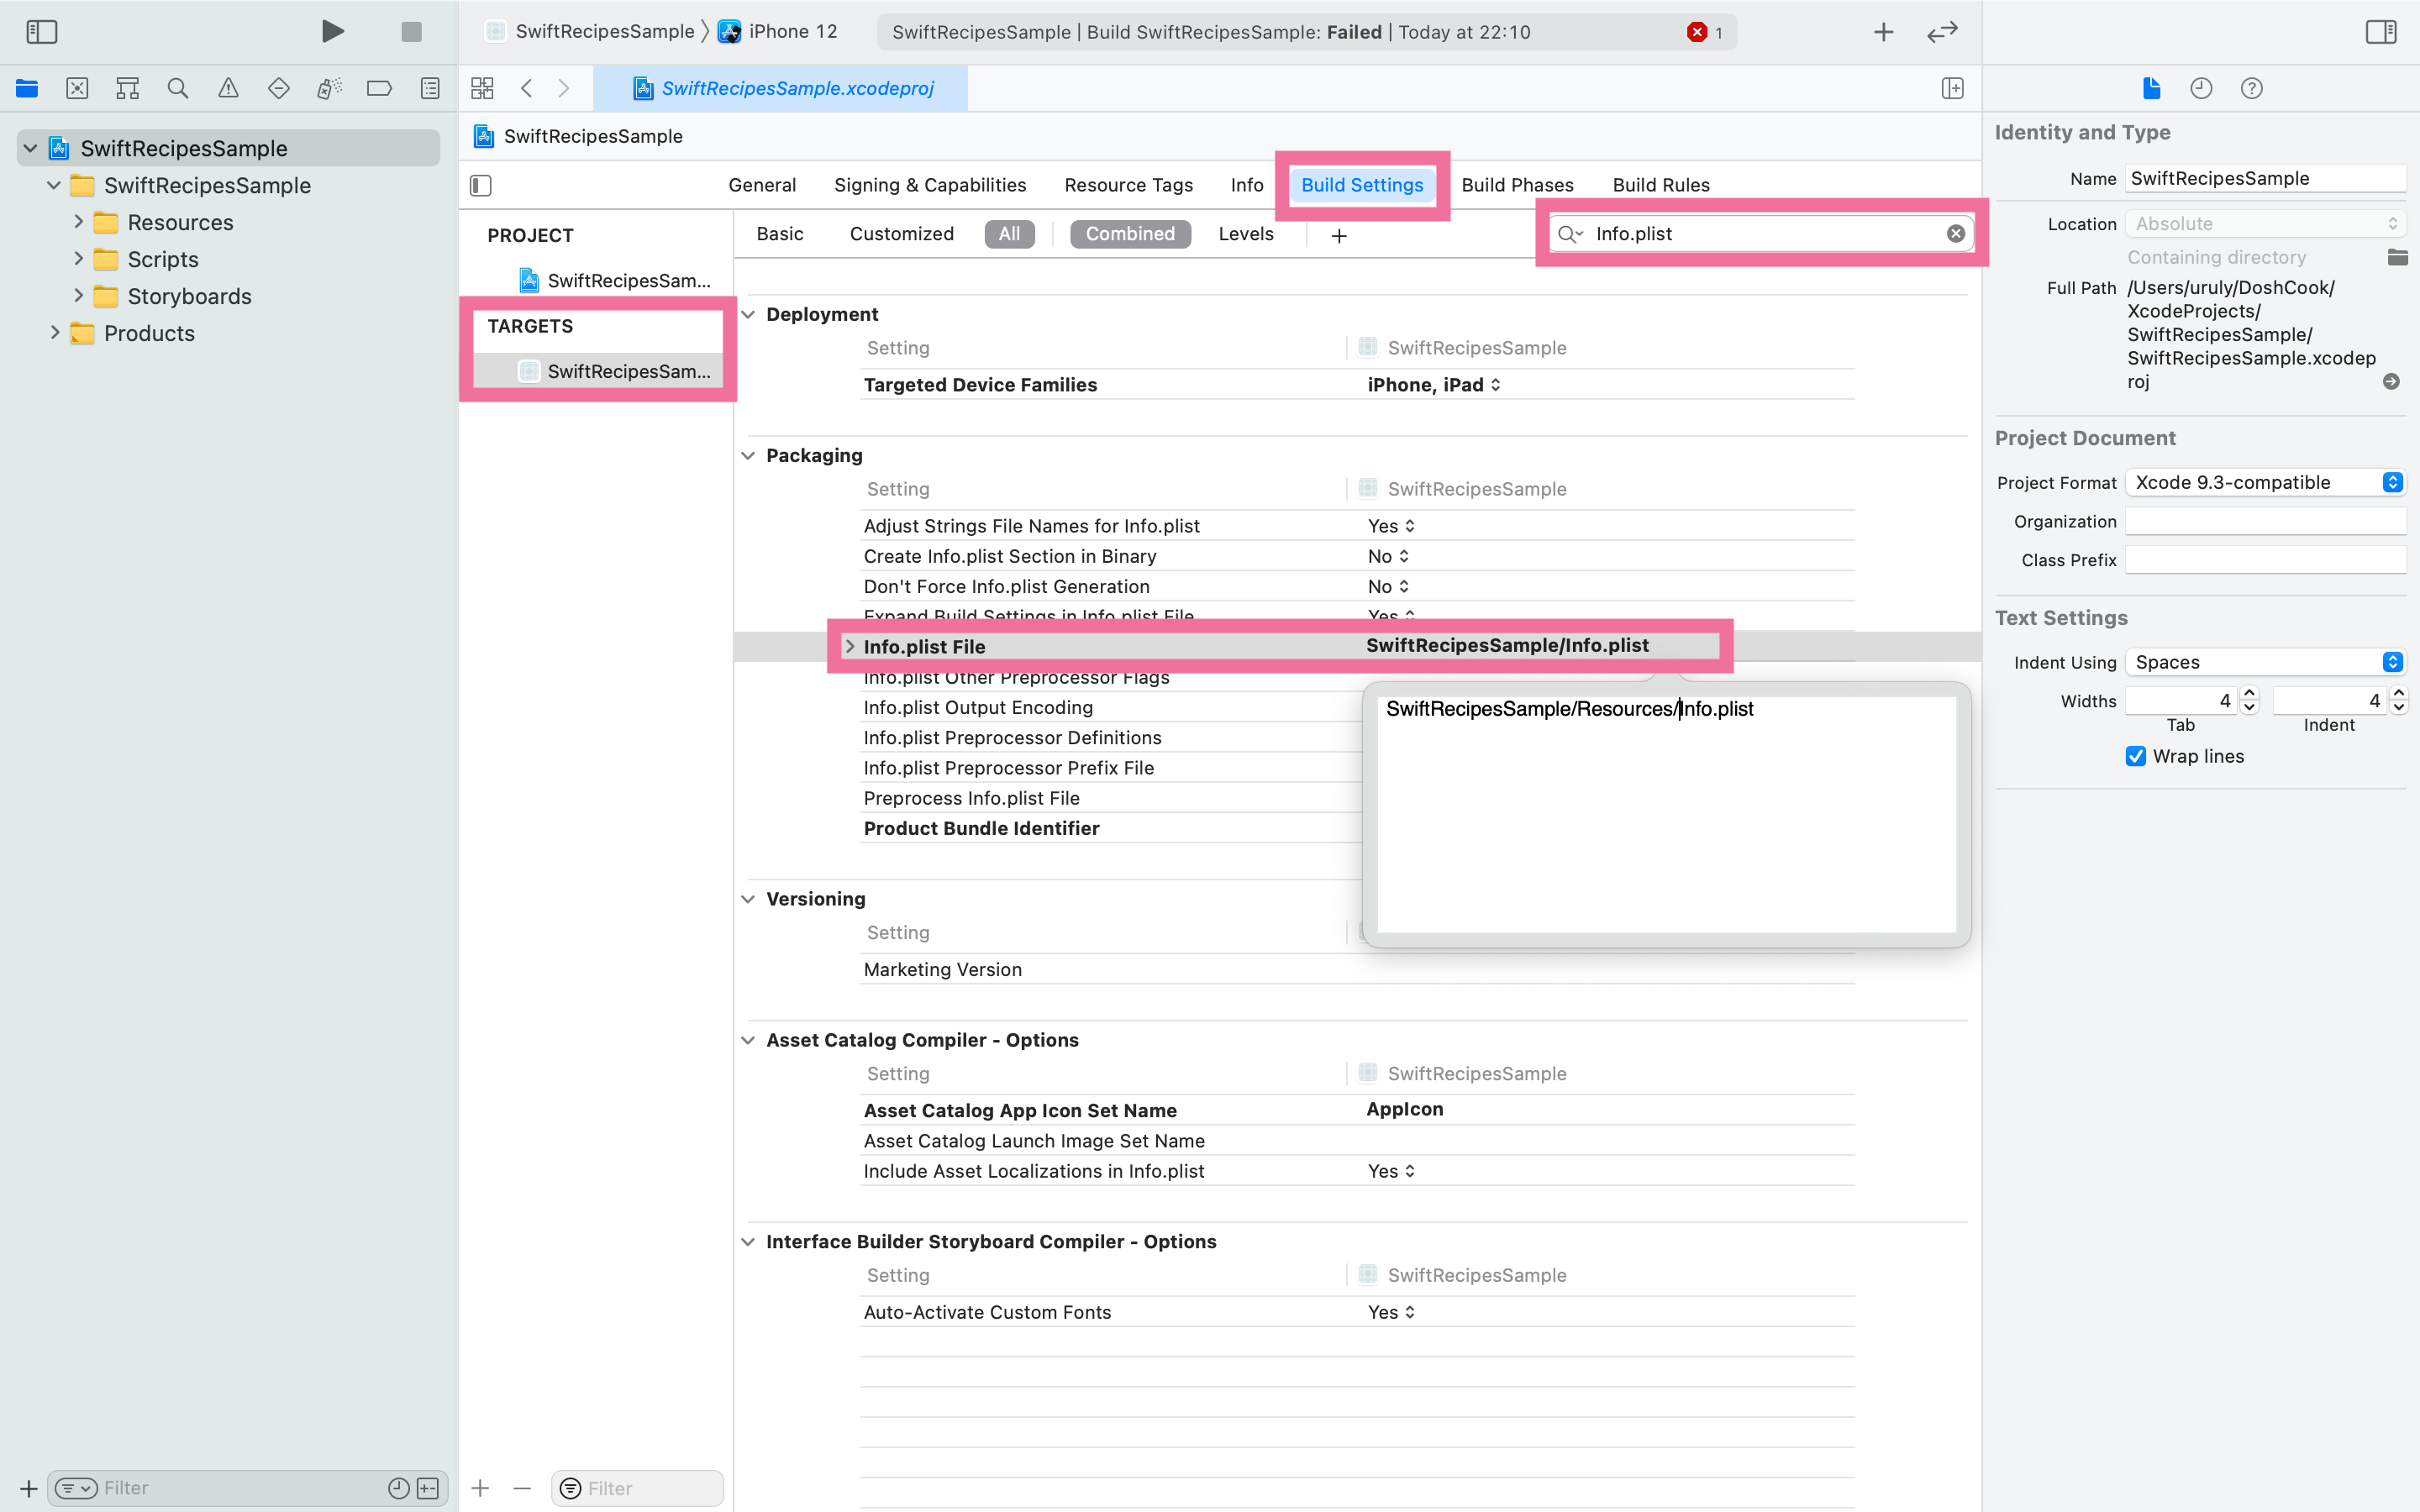
Figure 5
I basically organize my projects into folders like this.
About SceneDelegate
Starting with iOS13, SceneDelegate.swift is generated in the project as a template. It is used to split the same app and open it at the same time, as shown in Figure 6 below.
Figure 6
Reference: Scenes | Apple Developer Documentation

If SceneDelegate is not used
If you want to support iOS13 or lower, or if you don't want multiple screens to be activated, follow the steps below to delete the file.
-
Delete
Application Scene ManifestfromInfo.plist.(Figure 7)

Figure 7 -
Delete
UISceneSession LifecyclefromAppDelegate.swift.Remove the code from AppDelegate.swift as shown below.
// Remove the following. // MARK: UISceneSession Lifecycle func application(_ application: UIApplication, configurationForConnecting connectingSceneSession: UISceneSession, options: UIScene.ConnectionOptions) -> UISceneConfiguration { // Called when a new scene session is being created. // Use this method to select a configuration to create the new scene with. return UISceneConfiguration(name: "Default Configuration", sessionRole: connectingSceneSession.role) } func application(_ application: UIApplication, didDiscardSceneSessions sceneSessions: Set<UISceneSession>) { // Called when the user discards a scene session. // If any sessions were discarded while the application was not running, this will be called shortly after application:didFinishLaunchingWithOptions. // Use this method to release any resources that were specific to the discarded scenes, as they will not return. } -
Add
var window: UIWindow?toAppDelegate.swift.import UIKit @main class AppDelegate: UIResponder, UIApplicationDelegate { // Add var window: UIWindow? func application(_ application: UIApplication, didFinishLaunchingWithOptions launchOptions: [UIApplication.LaunchOptionsKey: Any]?) -> Bool { // Override point for customization after application launch. return true } } -
Delete
SceneDelegate.swift
Development Using XIB
There are many ways to develop iOS applications, even just using the Swift language, and the same goes for the implementation of the UserInterface (UI). There are two ways to implement a UserInterface (UI): using an Interface Builder (IB) such as Storyboard / xib / SwiftUI, and writing code.
- Storyboard
- xib
- SwiftUI
- code only(UIKit)
Why Use XIB?
Each method has its own merits and demerits, but in this article, we will only compare Storyboard and xib.
Storyboard and xib are both IB-based methods. Storyboard has the advantage of clear screen transitions, but has disadvantages such as conflicts during team development and difficulty in injecting dependencies (DI) in the initializer. Therefore, we choose to develop using xib.
| Team Development | DI | |
|---|---|---|
| xib | ○ | ○ |
| Storyboard | △ | △ |
What is DI in the initializer?
If you use xib, you can pass the value in the initializer as follows.
import UIKit

final class ViewController: UIViewController {

    private let initialText: String

    // DI
    init(initialText: String) {
        self.initialText = initialText
        super.init(nibName: "ViewController", bundle: nil)
    }

    required init?(coder: NSCoder) {
        fatalError("init(coder:) has not been implemented")
    }

}

// Generating
let viewController(text: "The value you want to pass in the initializer.")
In the case of Storyboard, DI in the initializer has been available since iOS13.
class ViewController: UIViewController {

    private let initialText: String

    init?(coder: NSCoder, initialText: String) {
        self.initialText = initialText
        super.init(coder: coder)
    }

    required init?(coder: NSCoder) {
        fatalError("init(coder:) has not been implemented")
    }
}

// Generating
let storyboard = UIStoryboard(name: "ViewController", bundle: nil)
let viewController = storyboard.instantiateInitialViewController { coder in
    ViewController(coder: coder, initialText: "The value you want to pass in the initializer.")
}
Reference: https://qiita.com/shtnkgm/items/cad6f52c489612628fd4
These can be used in combination. The way to do this varies depending on the project you are participating in. Although it is difficult to decide whether it is good or bad, we will basically implement it using xib in this site.
Create A View
Create Views folder under Scripts.
Since the ViewController is going to be named CreateProjectSampleViewController, I created a folder called CreateProjectSample.
The current configuration is as follows.
.
├─ ProjectName.xcodeproj
└─ ProjectName
    ├── Scripts
    |    ├── AppDelegate.swift
    |    ├── SceneDelegate.swift
    |    └── Views
    |         └── CreateProjectSample
    |               ├── CreateProjectSampleViewController.swift
    |               └── CreateProjectSampleViewController.xib
    ├── Resources
    |    ├── Info.plist
    |    └── Assets.xcassets
    └──  Sotryboard
        └── Base.lproj
Select New > File > Cocoa Touch Class and Next.(Figure 8)

Figure 8
Create CreateProjectSampleViewController and check Also create XIB file. (Figure 9)
| Item | Select Item |
|---|---|
| Class | CreateProjectSampleViewController |
| Subclass of | UIViewController |
| Also create XIB file | Checked |
| Language | Swift |
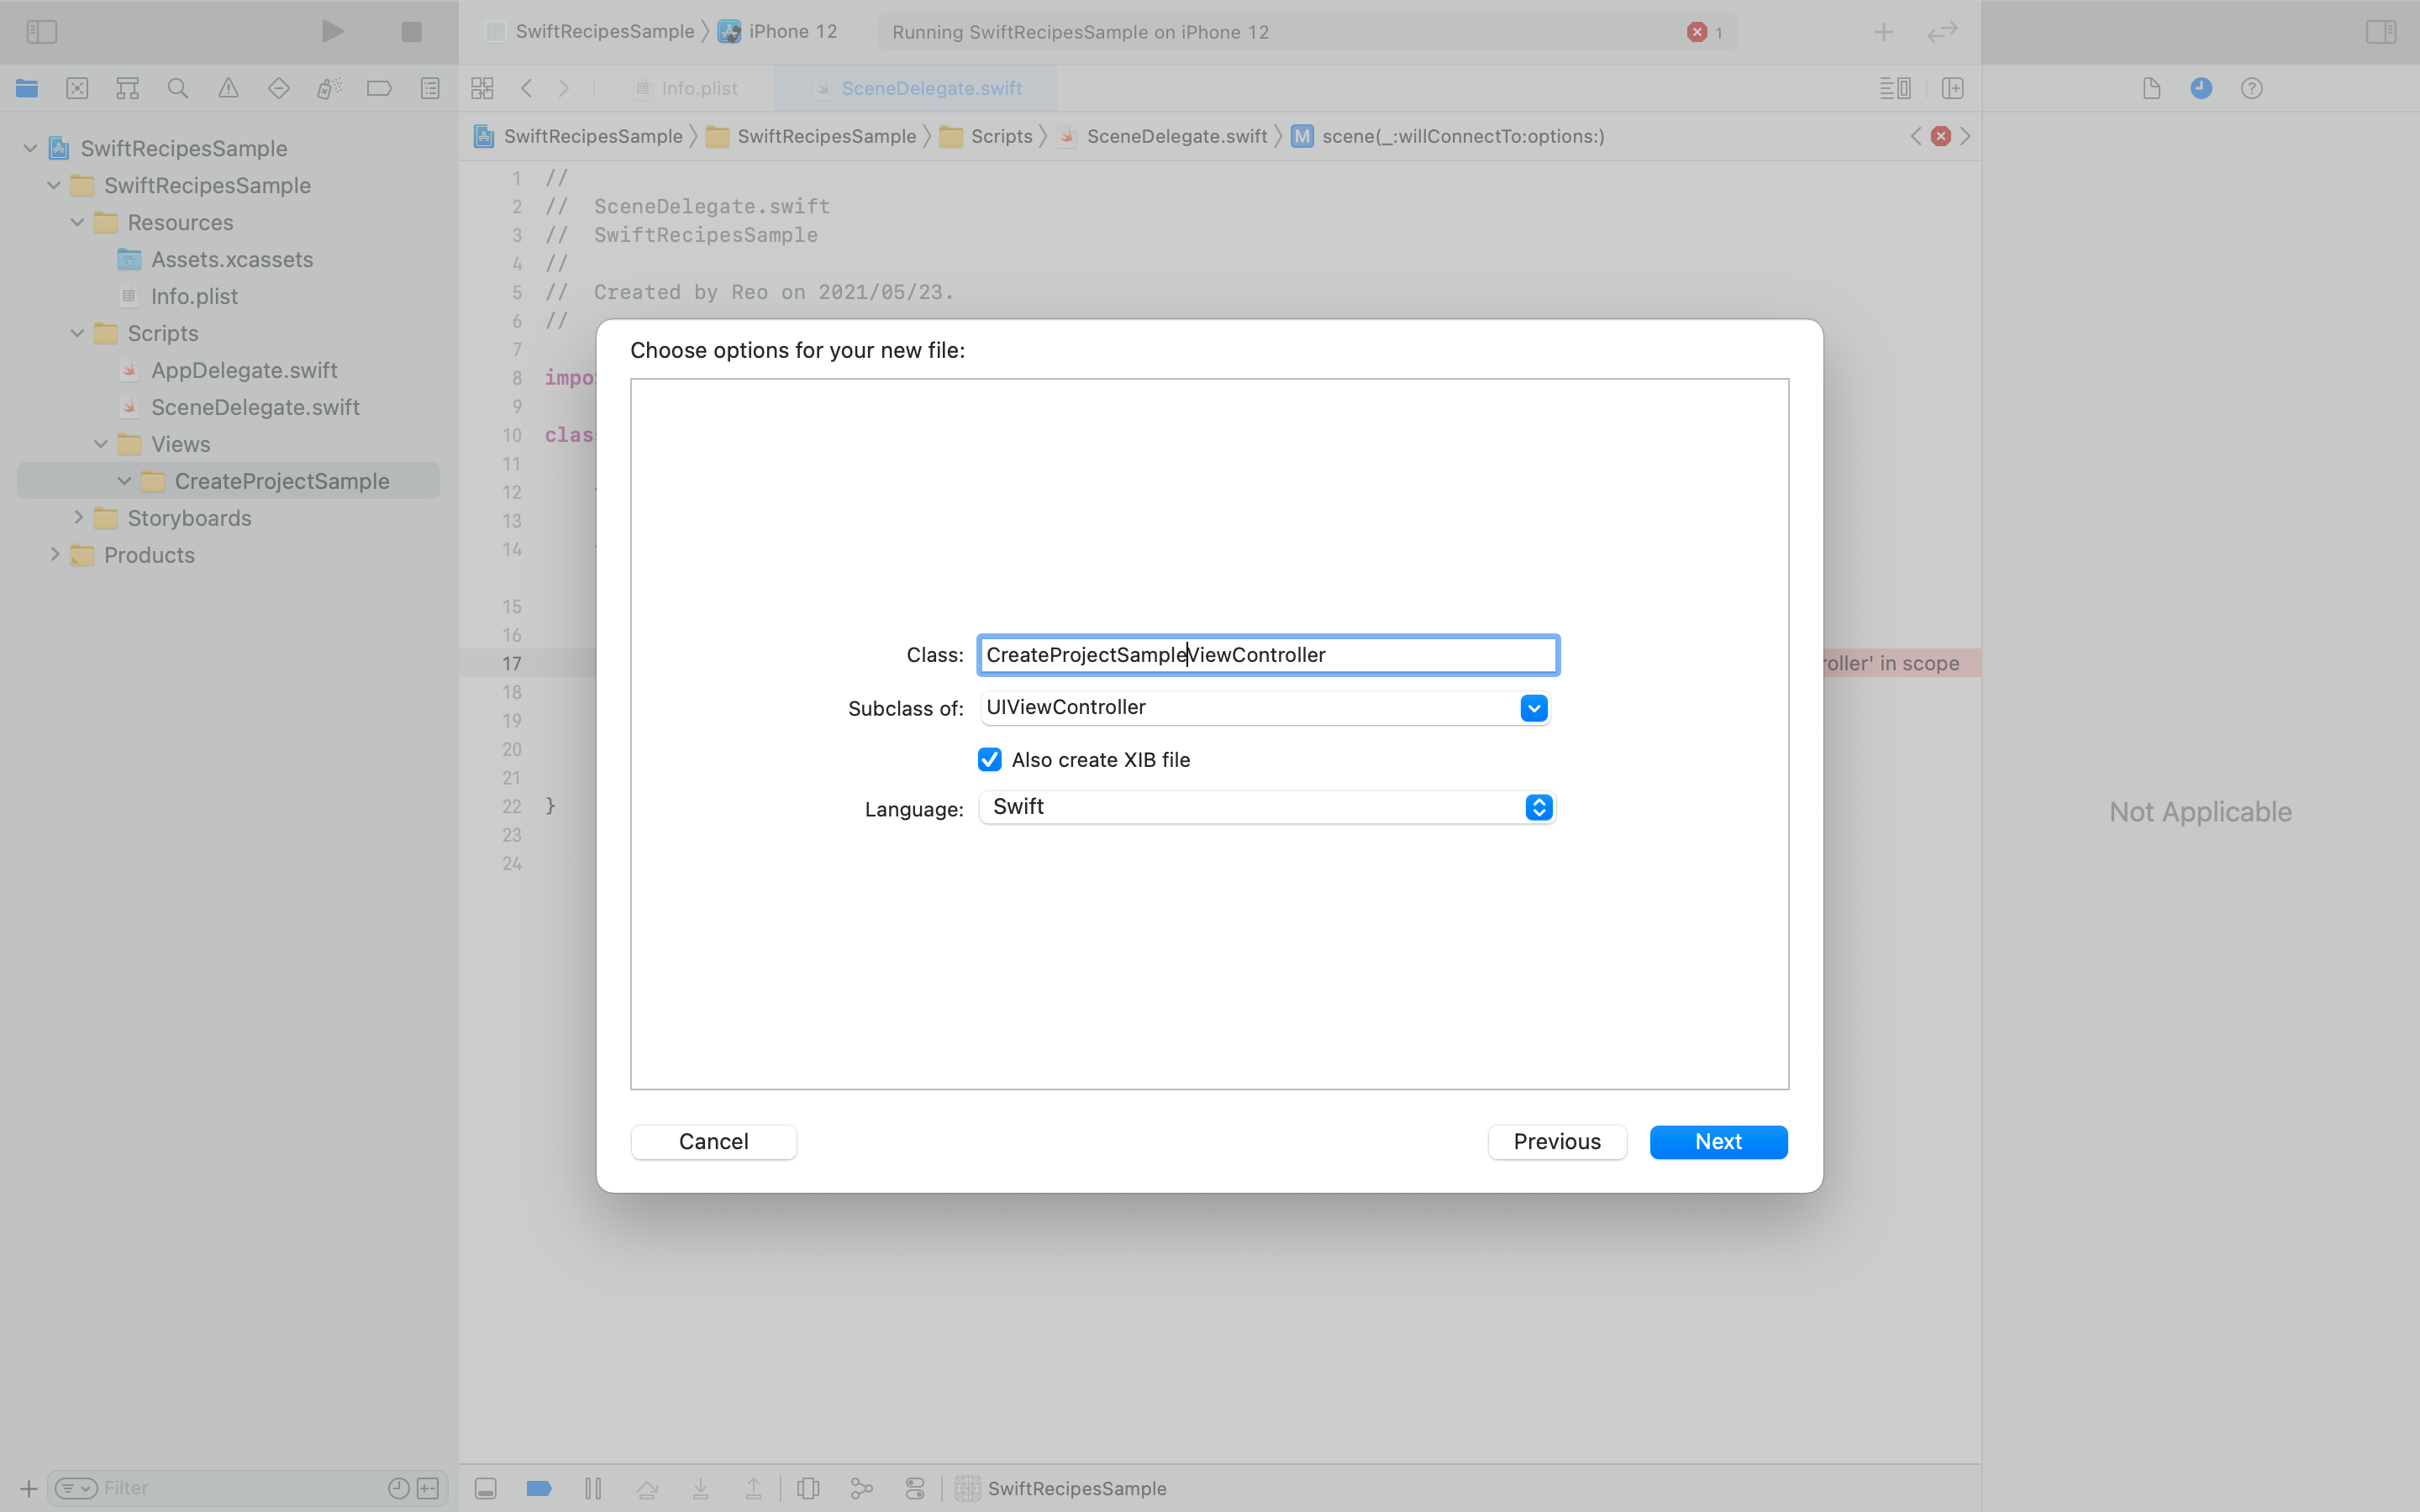
Figure 9
Display Of The First View
When using Storyboard, the screen pointed to by the arrow (→) on the Storyboard will be opened after the application starts. For development using xib, you need to indicate the screen that will be opened at startup with code.
-
Remove the
Main.storyboard. -
Remove the
Main storyboard file base namefromInfo.plist.(Figure 10)
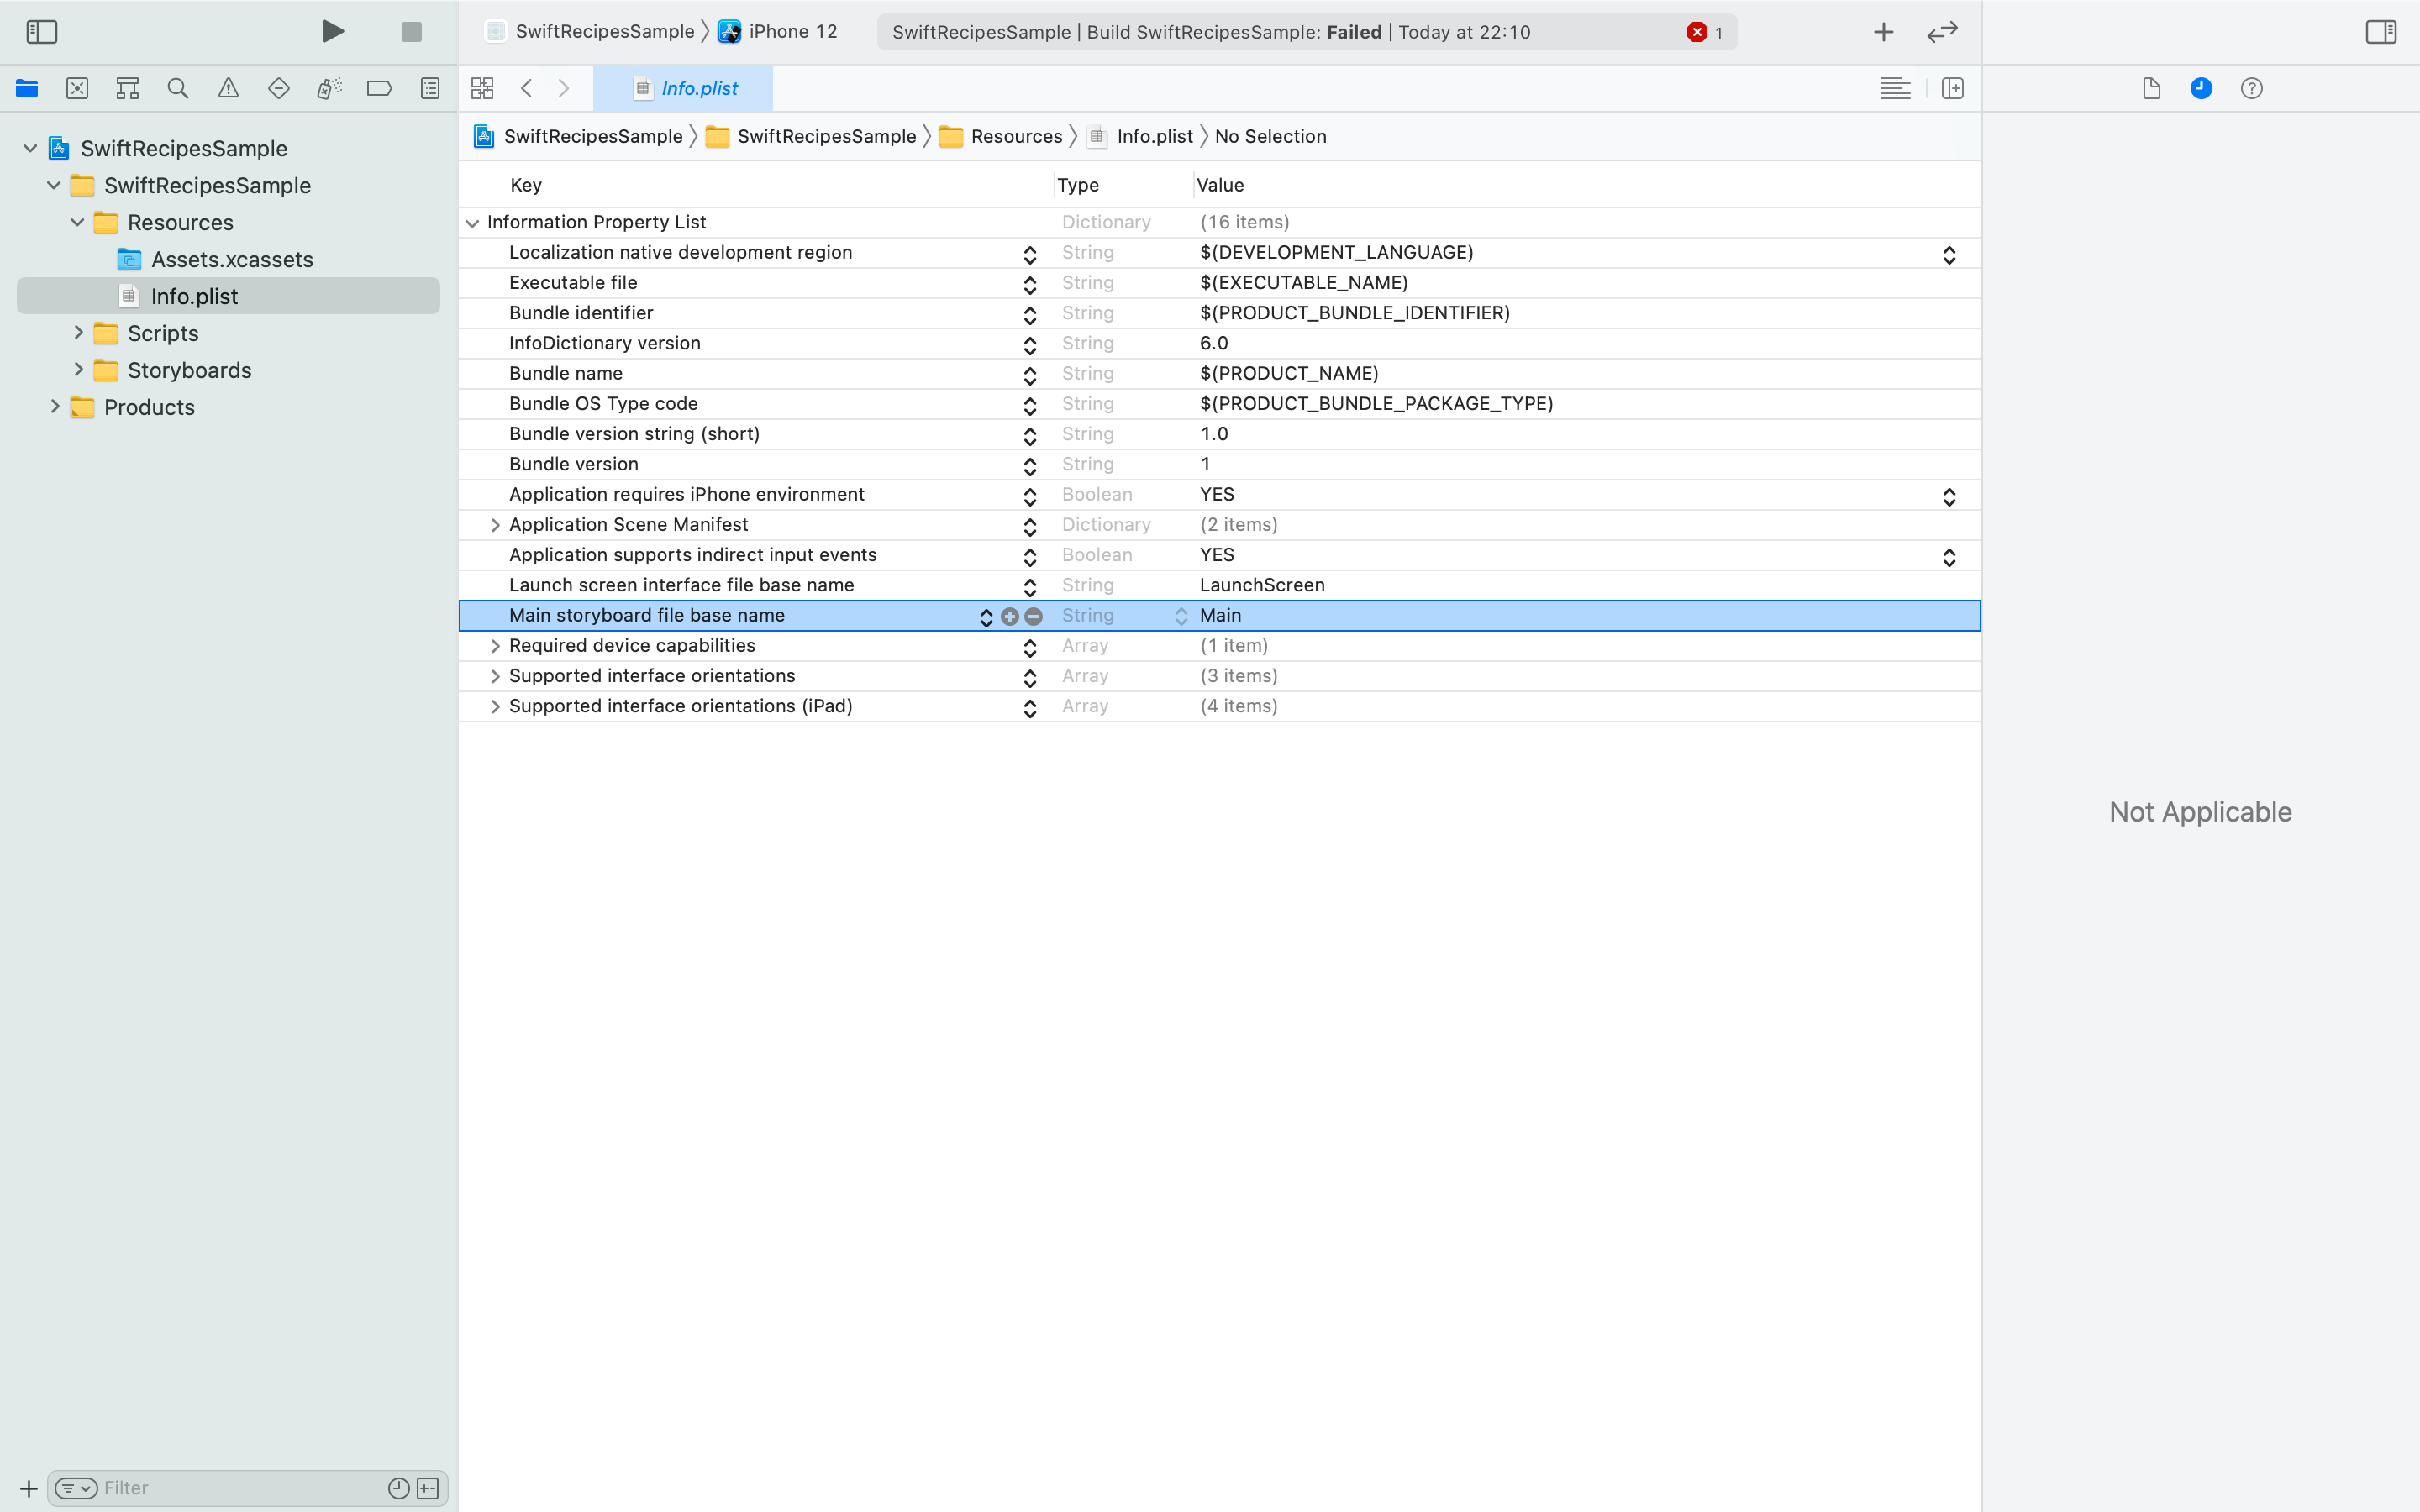
Figure 10 -
Configure the screen that opens when the app is launched on the code.
The location to specify the startup screen depends on whether you useSceneDelegate.swiftor not.-
When using SceneDelegate.swift
If usingSceneDelegate, Remove theStoryboard NamefromInfo.plist>Application Scene Manifest>Scene Configuration>Application Session Role>Item 0(Default Configuration).(Figure 11)
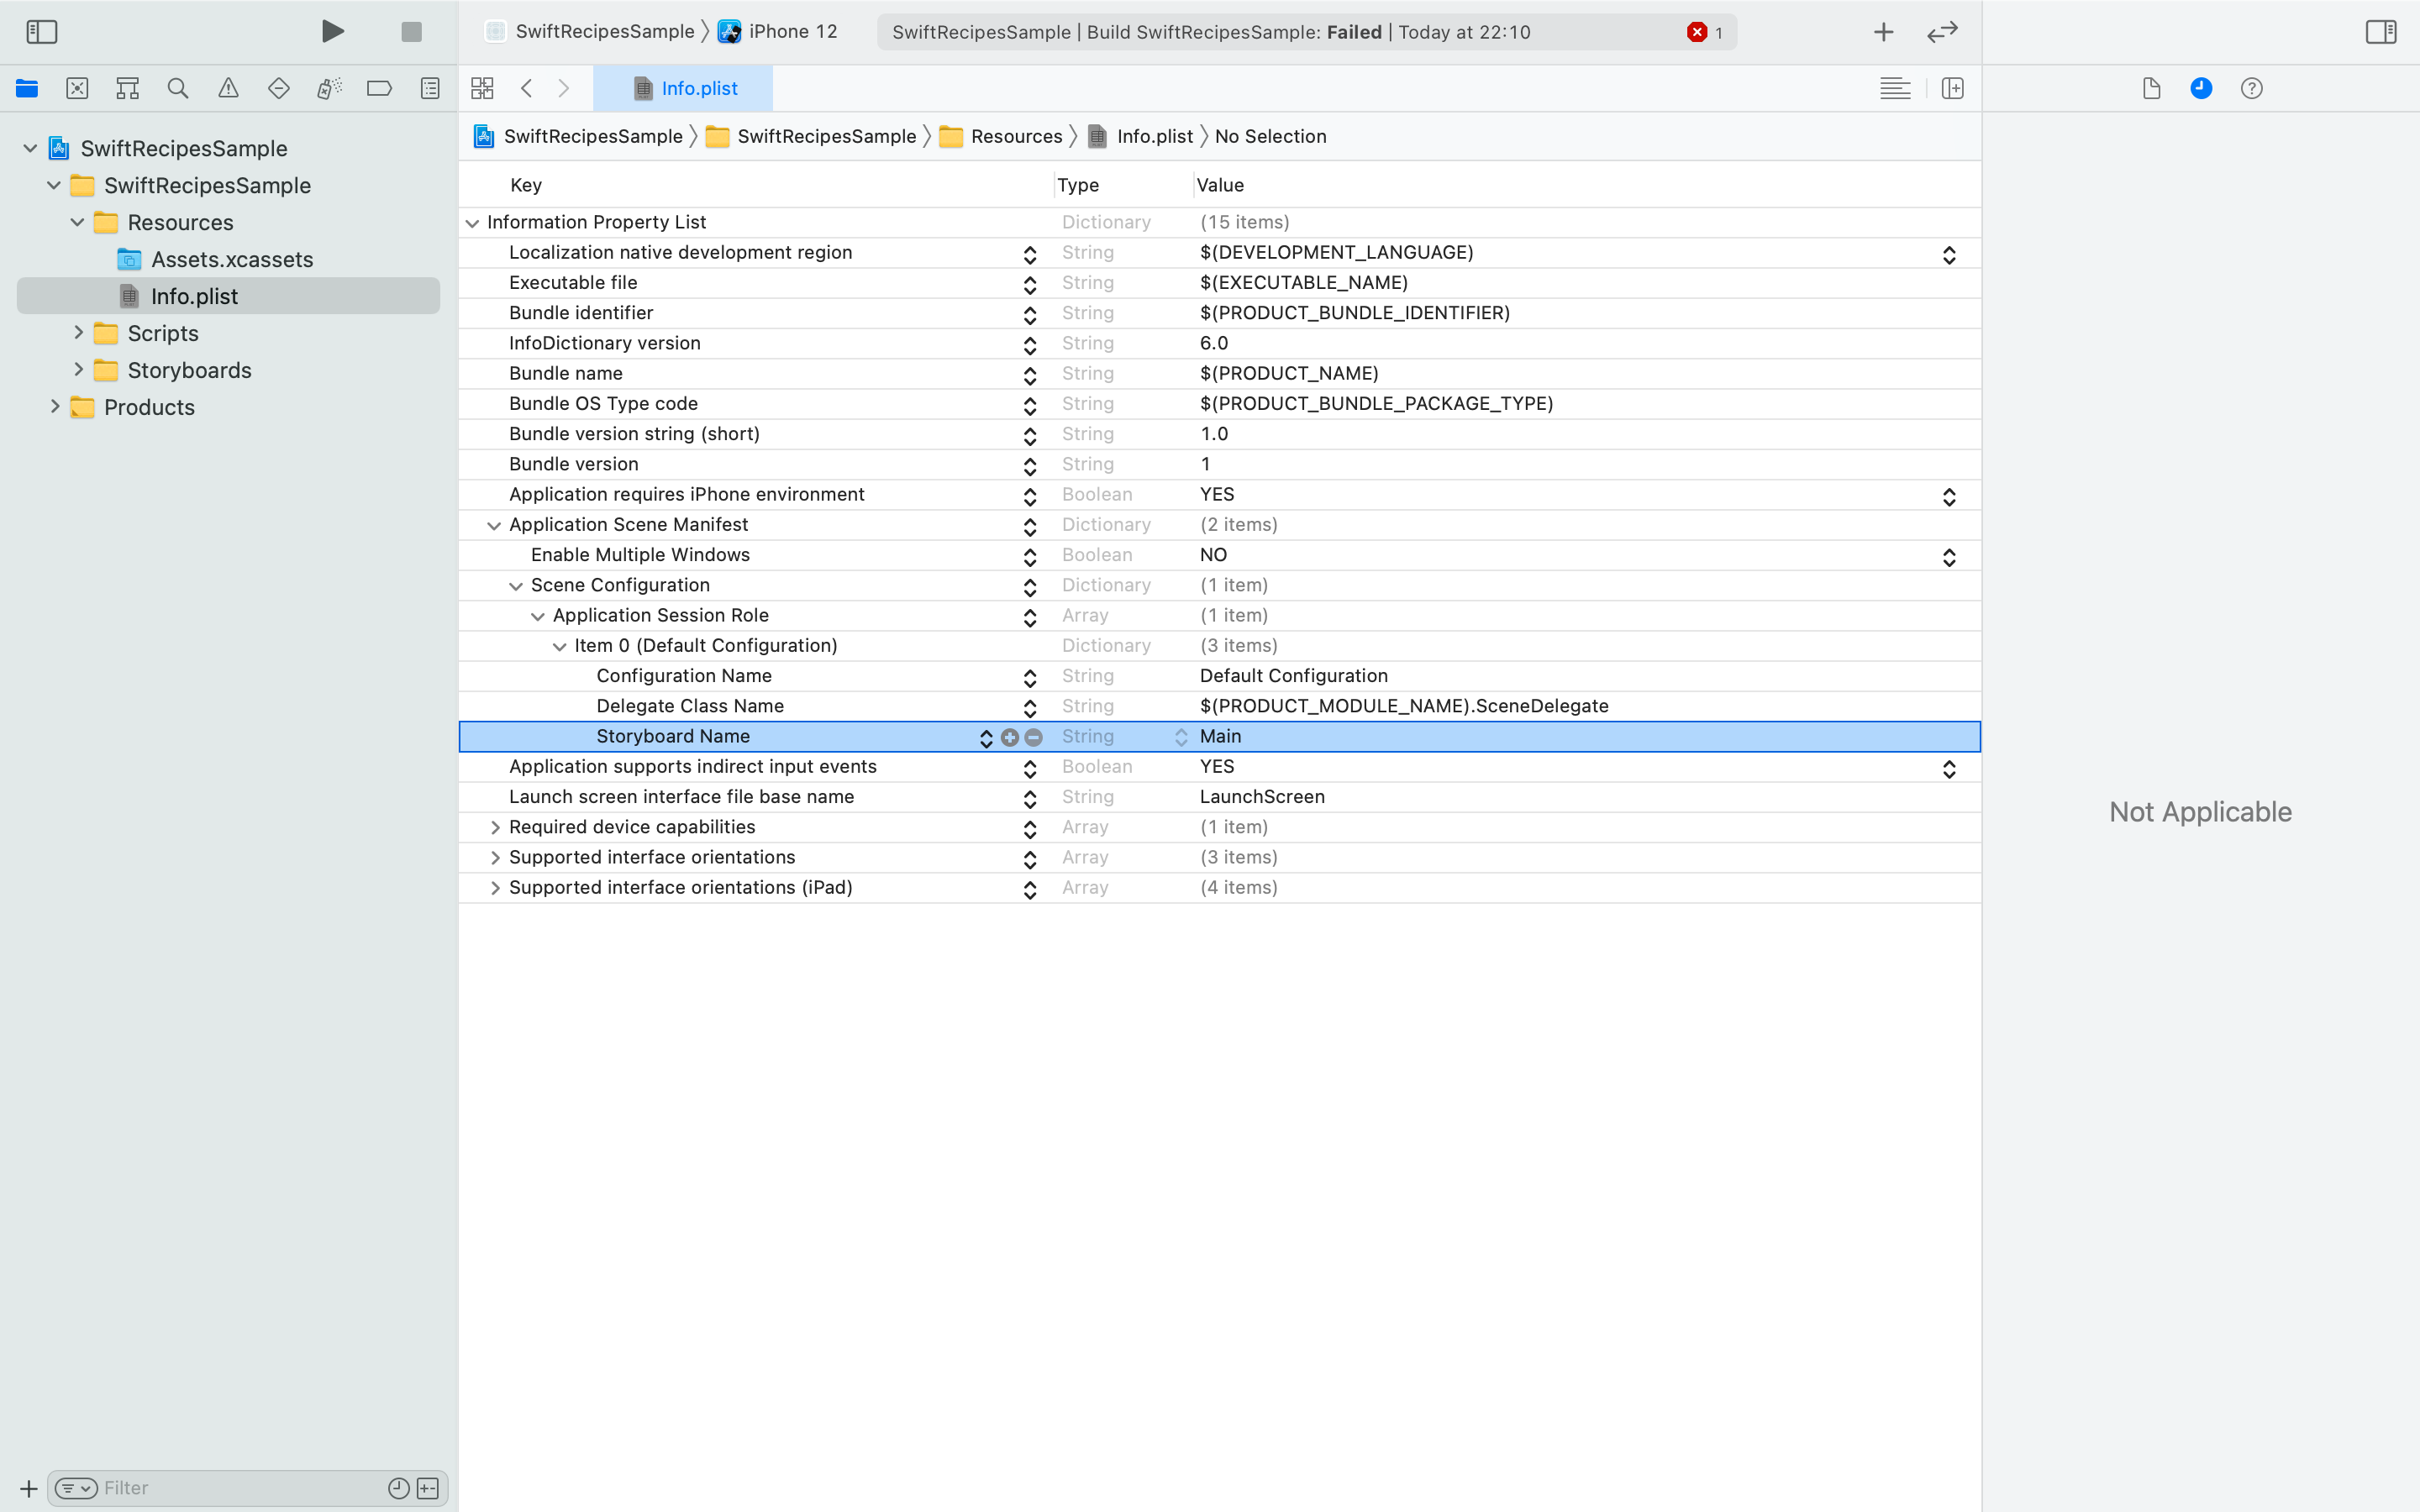
Figure 11In
SceneDelegate.swift, put the following inscene(_:willConnectTo:options:).import UIKit class SceneDelegate: UIResponder, UIWindowSceneDelegate { var window: UIWindow? func scene(_ scene: UIScene, willConnectTo session: UISceneSession, options connectionOptions: UIScene.ConnectionOptions) { guard let windowScene = (scene as? UIWindowScene) else { return } // Generate window. let window = UIWindow(windowScene: windowScene) // Specify the ViewController you want to open at the first startup. let viewController = CreateProjectSampleViewController(nibName: "CreateProjectSampleViewController", bundle: nil) // Set to window root. window.rootViewController = viewController // Display window. window.makeKeyAndVisible() // Make self.window the generated window. self.window = window } } -
When SceneDelegate.swift is not used
If you don't useSceneDelegate, put the following inapplication(_:didFinishLaunchingWithOptions)ofAppDelegate.swift.@main class AppDelegate: UIResponder, UIApplicationDelegate { var window: UIWindow? func application(_ application: UIApplication, didFinishLaunchingWithOptions launchOptions: [UIApplication.LaunchOptionsKey: Any]?) -> Bool { // Generate window. let window = UIWindow(windowScene: windowScene) // Specify the ViewController you want to open at the first startup. let viewController = CreateProjectSampleViewController(nibName: "CreateProjectSampleViewController", bundle: nil) // Set to window root. window.rootViewController = viewController // Display window. window.makeKeyAndVisible() // Make self.window the generated window. self.window = window return true } }
-
Now we are ready to develop using xib.
We will proceed with development by placing ViewController under Views.
Conclusion
Many of the recipes introduced on this site will be based on this project creation method.